Mastering the Art of 3D Paintings: Halloween Watercolor Illustration Using Viviva Colors
Are you tired of your artwork lacking depth and dimension? Do you want to know the secrets to creating stunning 3D artworks every time? In this blog post, I will reveal the exact technique I use to add depth, realism, and dimension to my artwork. I’ll let you in on my creative process and reveal how I master lighting and shading to give you insights that will transform your paintings. I will walk you through all the steps, ensuring you have a comprehensive understanding of the process. Whether it’s a simple piece or a complex one, a still-life composition or a lifelike portrait, I am confident that this technique will help make your painting process easier and better and support you on your way to mastering watercolor painting.

In this Halloween painting tutorial, I’ll be using my Viviva Sketchbook and Colorsheets to create a Jack o’lantern painting and a Halloween watercolor portrait.
You can see all these in action here:
Give your subjects volume
The most important thing you have to do to create a sense of volume and three-dimensionality in your artwork is to shade your subjects carefully. To do that, you need to make sure you’re using a range of different values so your subjects can pop off the paper. That means that for every color you use, you want to make sure you’re using several different shades of that color – from highlight, to midtone, to shadow. You can use as few as two different shades to get satisfying results. However, the more shades you use, the better the result. For A5 or 5x7in works, like the two in this tutorial, I like to use between three and six different shades per color.
For painting Jack o’lantern, I used six different shades of orange to give the subject volume. The painting of a Halloween portrait only has two or three different shades of each color.

Break your subject down into shades
It is important to decide how many different shades you want to use in advance, before you start painting, so you have a clear idea of what you’ll be doing. You can do that by studying your reference photo closely and determining how many distinct shades there are or how many shades you need to make your artwork look realistic.
You can then create a quick sketch to map all the shades you want to use. This shading guideline will let you know which shade will go where in your painting. This will simplify the painting process to work similar to a paint by numbers, which will make the painting process itself faster and less stressful. In addition, you will be less likely to lose track of what you’re doing and make mistakes.

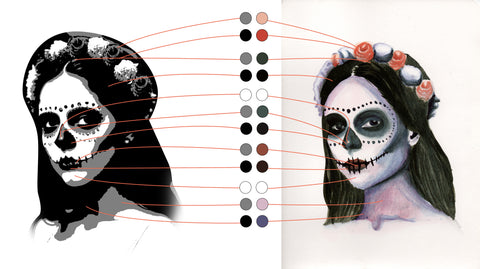
Another way in which you can simplify your reference photo and determine the basic shades in it is to use photo editing software to posterize the photo. The posterize command simplifies the photo into however many shades you want automatically so you don’t have to sketch it out yourself. This is how I simplified the reference photo for painting a Halloween portrait, as you can see further up.
Once you have your guideline for shading, you can mix the shades you need by comparing your reference photo and the guideline to determine what each of the shades should look like.
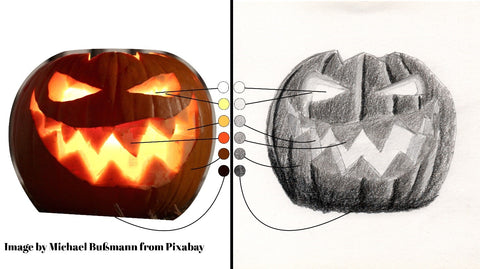
I broke down the reference photo for my Jack o’lantern watercolor painting into six different shades of orange.
My Halloween portrait painting consists of two shades for the flowers, two for the hair, three for the black face paint, two for the lipstick and three for the skin.
Using this technique to create paintings
With the artwork fully planned out, you can start painting. Get your sketch ready, place your reference photo and your shading guideline close by so you can consult them as needed, and grab your paints. All you have to do now is add the colors and the shades to your painting the way you mapped them out in your shading guideline.

Where transitions between different shades need to be soft and gradual, you can avoid harsh transitions by blending the shades into one another with a damp brush.


By incorporating these tips and techniques into your paintings, you'll be on your way to mastering watercolor art and creating stunning 3D artworks easily and quickly. If you try out this technique yourself or if you recreate any of our artworks, let us know on YouTube or Instagram.
If you are someone who loves to paint please share your work below in the comment section or write to us at support@vivivacolors.com.
This Blog is created by one of our Viviva Ambassador Artist -Alex Graybergh
Happy painting to you guys and see you in the next one :)


